We all want to make use of every square inch of a space available in a house, building, apartment, hotel or office – and your door choice is one of the ways to help with this. A cavity unit is considered by many as the best solution to save space, regardless of the room size or design.
What is a cavity unit?
A cavity unit is a door designed to effortlessly slide into a pocket in the wall, rather than swing like a hinged door. One of the biggest objectives in building, renovating or even redecorating a house, is to maximise every area. To fully use the space the hinged doors occupy, cavity units are a great solution.
Benefits of a cavity unit
A door cavity unit promotes optimal use of the space available. Hinged doors occupy both sides of the opening, whereas cavity sliding doors free up this floor space. Where a hinged door may prevent objects and furniture from being in close proximity to the door, due to the risk of opening the door and hitting the object, cavity doors do not have this problem. Rather than swinging out wide, they simply slide in and out of the wall.
For example, the Evolution Premium cavity unit we offer is a floor to ceiling, zero clearance sliding door. We have designed the cavity unit to allow the full size opening to be achieved, with a minimal gap between the door, floor and ceiling.
Its versatility gives homeowners and builders so much choice. Most of the cavity units we provide allow a wide range of sizes, door styles and door types – design is not sacrificed for functionality.
Our four-wheel ball bearing carriages can support a maximum door mass of 70kg, which furthers your choices as the tracks are suitable for a range of different styles and materials.
We also offer Evolution Touch, which is magnetisation for effortless door opening and closing. The door is firmly held inside the cavity, you simply need to push the edge of the door to activate the spring-loaded release system to release the door.
The best bit? Installing a cavity unit is quick and easy!
The installation process
Before you begin installing the cavity unit, you must prepare the opening, ensuring the height and width are appropriately sized for the door. Also check that the materials provided are of high quality.
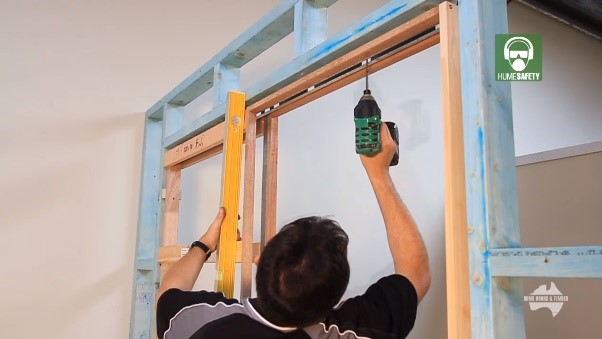
The first step when installing the cavity unit, is to install the cavity itself. It is all about ensuring the track and back post of the cavity are properly attached to the house frame, to then be able to make sure the door moves efficiently and safely.
Once the cavity is installed, the door must be prepared. The first part of this is checking the door is straight and free of imperfections – which will be easy due to our Hume Doors & Timber guarantee! Then the base plates are to be attached to the top edge of the door, 80mm from each end.
Installing the door is the next step. Check that no obstructions are protruding into the cavity, you wouldn’t want to damage the door! Fit the wheel carriages, slide the door into the cavity and lock carriage pins appropriately. Make any adjustments to heights and plumb. Fasten and adjust door guides to ensure a smooth movement. Fix the timber pelmet cover with screws.
Then you’re all done! Your brand new cavity unit is installed and ready to go!
Note: double door installation is slightly different. Two cavities and two doors are required, installed as per single cavity installation instructions. Double stops must be installed into the track, ensuring doors close properly. Timber pelmet cover trims are installed, spanning the whole double opening.
If this quick overview has was a little confusing, check out the full video demonstration below. And obviously we’d love you to purchase your cavity unit from one of our fantastic distributors!